My AI Butler: Semantic Search Part II
Jan 2, 2024
During OpenAI's DevDay conference a couple of weeks ago, they announced the new Assistants API. This new API makes it easier to create custom AI assistive agents. Assistants can call AI models and use tools to accomplish tasks. This post is a continuation of my previous one on implementing semantic search with OpenAI's embeddings API.
This time, I used an assistant to implement the same semantic search feature. With assistants, it was easier and the results were far better. Also, last time I suggested a few ways to improve my implementation. Again, by using assistants, I was able to implement these improvements easily. I called my new agent AI Butler. Before we begin, I recommend taking a look at the previous post to get familiar with using OpenAI APIs and to learn more about LLMs in general. In this post, I assume you're familiar with the API.
OpenAI Assistants API
I mentioned that assistants can use tools to accomplish tasks. The tool I had the assistant use is called retrieval. As the name suggests, it's used to retrieve information from files. Naturally, this is what I used to re-implement my semantic search solution. Using the retrieval tool, we just need to give the assistant any document—or list of documents—and it will be able to answer questions about them. This is very powerful, as it saves us a lot of the work needed in the past to accomplish something similar.
As I described in my last post, there was some work to do beforehand when implementing semantic search. First, we needed to pre-process our documents. This involved chunking the text in each file, and then generating their embeddings. After that, we had to use some form of storage—such as a vector database—to persist these embeddings. When it was time for querying, we first needed to generate the embedding for the query text, then search our database by using techniques like cosine similarity. After that, we needed to sort the results and, finally, return them. That's without including other optimizations such as re-ranking. This, of course, made the final implementation not that great. And, it was still cumbersome to build.
Enter the Assistants API. I have to say I was impressed when I used it. With a few lines of code, I was able to create a superior application. The first thing I noticed was that we don't need to worry about document pre-processing. The assistant takes your files and it does all the work for you. We also don't need to worry about generating and storing embeddings. Once we have the assistant set up, we can just ask questions in plain text and it provides the answers back.
The assistants API introduced three objects to help us achieve the above tasks easily. These new objects are threads, messages, and runs. In the next section, we'll take a look at each one of them.
Working with Assistants
Below is a picture showing the way assistants, threads, messages, and runs are related. As you can see, an assistant can have multiple threads. Threads contain messages (coming from both the user and the assistant). Runs are created to execute a specific thread from an agent.
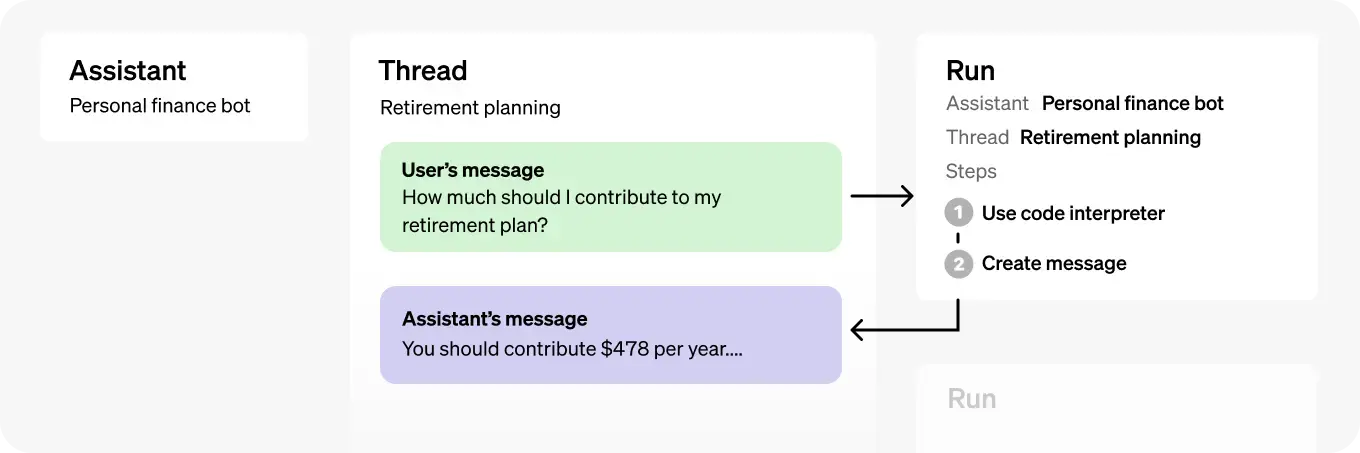
Diagram showing how assistants, threads, messages, and runs are related (image source: OpenAI)
When we create an assistant, we can provide it with data files, which it will use to retrieve information from. We also give it instructions—i.e. a prompt—that indicates the desired assistant behavior. And, we tell it what tools to use, in our case, the retrieval tool.
Let's take a look at the threads object. It represents an instance of a conversation between the agent and a user. This makes it easy to keep track of chat sessions. A thread can have multiple messages, which can be retrieved and displayed to the user.
Each message object is associated with a thread. When a user asks a question, it's passed to the assistant as a message—via the thread. Similarly, when the agent generates a response, it writes it to the thread as a message object. To identify who's writing each message to the thread, the message object has a "role" property. This property is set to either user or agent, helping to identify the source of the message. Also, the messages can be sorted by the time they were created. This further simplifies fetching and presenting them to the user in an organized way.
Finally, we have the run object. A run is executed each time we need to pass text to the agent and have it generate a response. The run object has a "state" property. So when we pass a request to the agent, the run enters a queued state. In the current API implementation, we have to continuously poll the run's state until it changes to complete. This indicates that the agent is done processing the request and has generated a response message.
As I mentioned, all messages are stored within their corresponding thread and can be retrieved as a sorted list. Let's now take a look at the new implementation I made for semantic search using assistants.
Implementation in Python
The new implementation is also written using the OpenAI Python library openai. I followed the steps listed next to create the semantic search solution (as in my previous implementation, using the files containing all the posts in this blog):
- Create the API client
- Upload the files that the agent will use to retrieve information from1
- Create an assistant referencing the uploaded files
- Start a thread and start accepting messages from the user
- After each message, execute a run to generate a response from the assistant
- Return the assistant's response to the user
- Repeat until no more messages from the user
These are all the basic steps needed. If you recall from my previous solution, this is just half the steps required before.
An API client is needed to then create the assistant and interact with it. Simply import the openai library and call the following function:
import openai

client = openai.OpenAI(
    api_key=os.environ.get("OPENAI_API_KEY")
)
Recall that we need to have an OpenAI API key saved in an environment variable (in this case OPENAI_API_KEY).
When uploading our data files, the API returns a file id for each file (the assistant will need these ids). Next, we create an assistant using the API client as:
def create_assistant(openai_file_ids):
    """ Creates an Assistant with the given file ids.
    """
    return client.beta.assistants.create(
        name="AI butler",
        instructions="You are a personal assistant that can search and retrieve information from files. Look for information in the files given to you to answer questions.",
        tools=[{"type": "retrieval"}],
        model="gpt-3.5-turbo-1106",
        file_ids=openai_file_ids
    )
A few things to highlight in the code above. Notice that we're passing the list of file ids—in this case, I uploaded twenty markdown files of my blog posts. We're also giving the assistant a prompt, indicating the desired behavior. And, we're indicating it to use the retrieval tool. The model selected for this assistant is gpt-3.5-turbo-11062.
We have now created the assistant (named AI Butler) and are ready to use it. To do this, we start a thread with a message input from the user. Then we execute a run and wait for the assistant's response. Finally, the response is returned to the user. In my implementation, all this is done in a loop, until the user ends the session:
def start_thread(assistant):
    thread = client.beta.threads.create()

    clear_the_screen()
    print("""
    ================================================================================
        Welcome, I'm your AI butler. Ask me anything about the STEM hash blog.
        (Enter 'q' to exit.)
    ================================================================================
        """)

    while True:
        # Get message from user
        msg = input()

        if msg.lower() == "q":
        break

        message = client.beta.threads.messages.create(
        thread_id=thread.id,
        content=msg,
        role="user"
        )

        run = client.beta.threads.runs.create(
        thread_id=thread.id,
        assistant_id=assistant.id,
        )

        run_status = poll_run_status(thread, run)
        while run_status != "completed":
        sleep(0.5)
        run_status = poll_run_status(thread, run)

        # Retrieve message list, sorted in descending order by default
        messages = client.beta.threads.messages.list(
        thread_id=thread.id
        ).data

        print_response(messages)
Notice that after executing the run, we need to keep polling its status until it changes to "completed". I do this every 0.5 seconds, but this is just an arbitrary value.
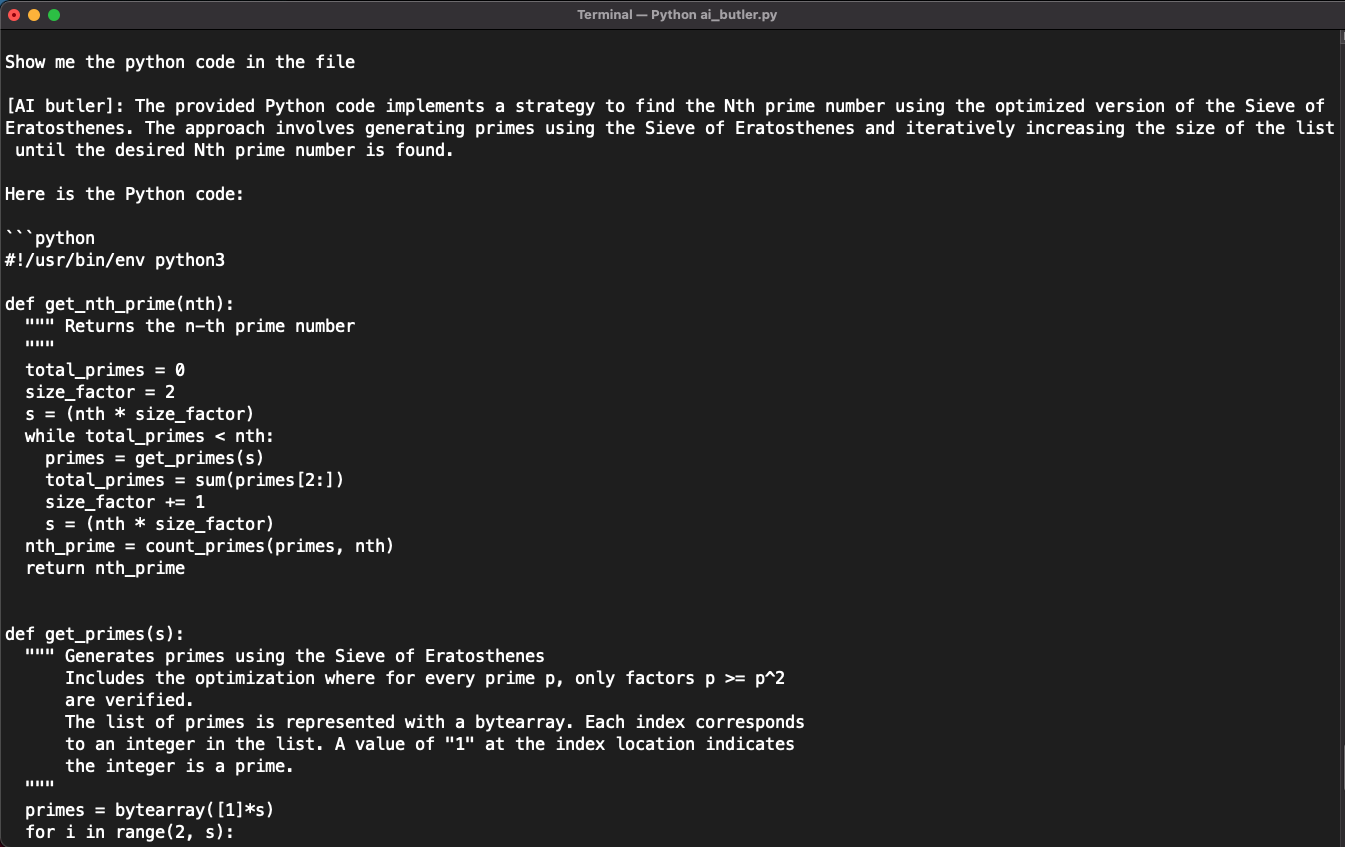
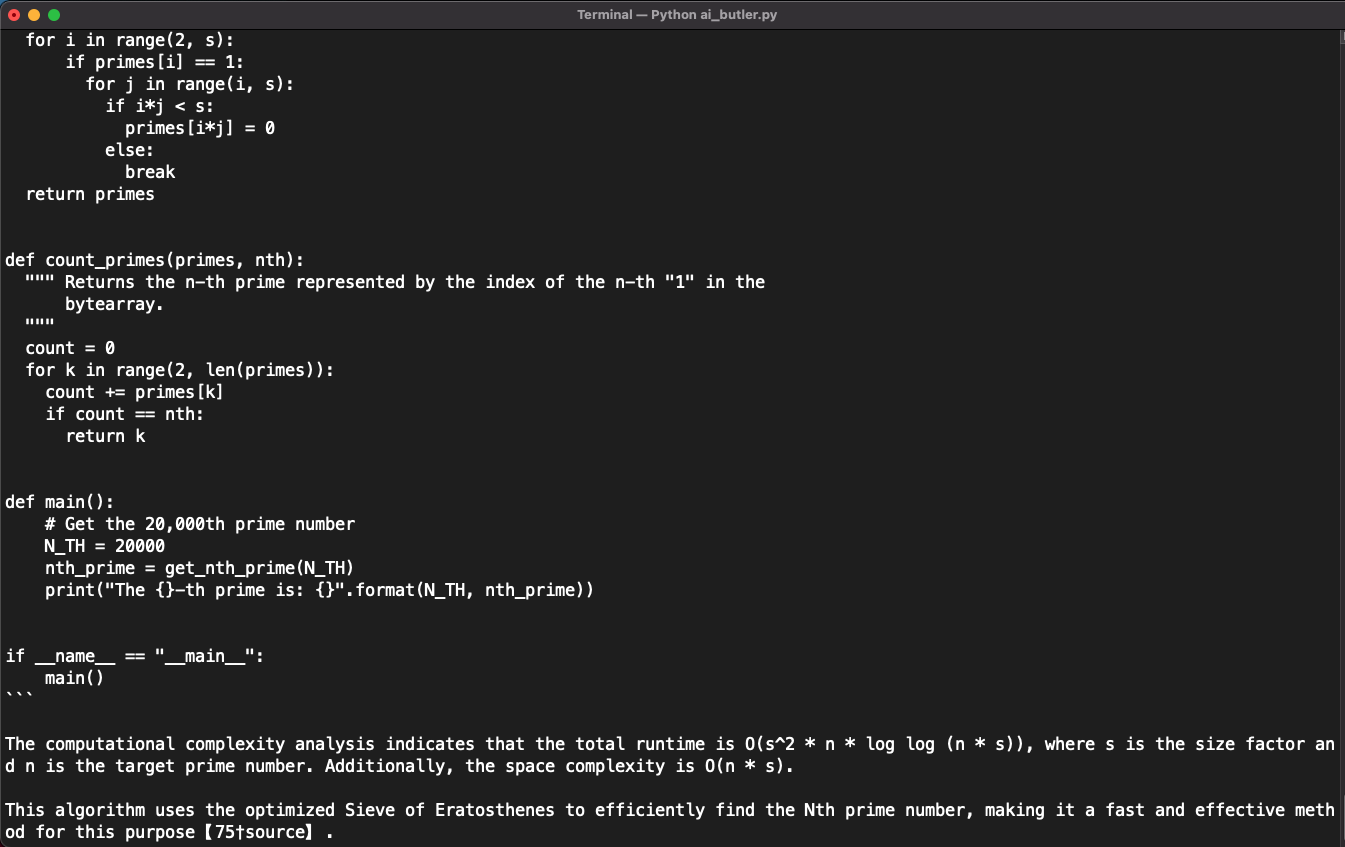
And that's it. I re-implemented semantic search using the assistants API with far better results. Let's take a look at how the assistant did with some questions. I asked the same questions as in my previous implementation. In comparison, this new solution is noticeably better.
Below are the screenshots of a conversation about prime numbers, based on the files I gave to the assistant:

What's Next?
The new assistants feature of the OpenAI API makes it easier to integrate LLMs into our applications. In this post, I showed you how to use it to implement semantic search—using the retrieval tool. But, this isn't the only tool assistants can use. Other tools available are code interpreter and function calling. The fact they can use other tools makes assistants more flexible and powerful.
As the name suggests, the code interpreter tool allows the assistant to write and execute (Python) code. The function calling tool lets the assistant determine functions that need to be called. We can then provide the function output for it to continue to work with them.
All this opens up a wide variety of applications that can be quickly implemented, and that are useful. Let's see what we can build next3.
Notes
-
Currently, the API limits the number of files to 20 per assistant. And, each file can have a maximum size of 512 MB. ↩
-
As of this writing, there's two models available for using the retrieval tool: GPT-3.5
gpt-3.5-turbo-1106and GPT-4gpt-4-1106-preview. The GPT-4 model is available once you've spent more than USD 1 in API usage. ↩ -
You can find the full code implementation in this post at my GitHub repo here ↩